
How to Make Creamy Coffee Without Machine: Simple Steps for Barista-level Foam at Home
Jump To
Silky Smooth Coffee at Home: How to Make Creamy Coffee Without Machine
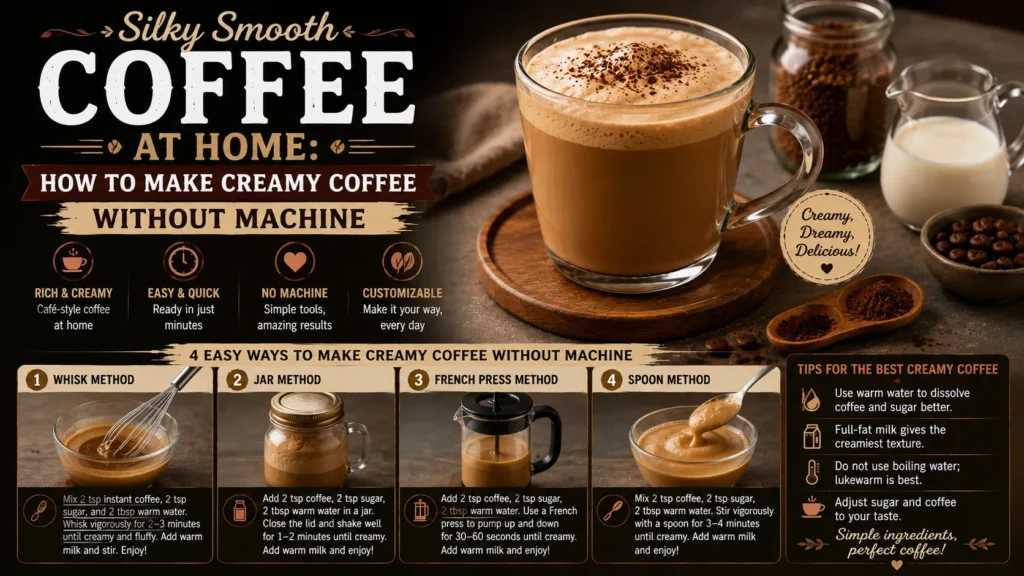
Imagine waking up to a velvety latte‑style cup without owning an expensive espresso machine. Many coffee lovers assume that creamy texture requires professional gear, but the truth is far simpler. In the next few minutes you’ll learn exactly how to make creamy coffee without machine using tools you already have in your kitchen.
Key Takeaways
- You can create silky foam with a French press, mason jar, whisk, or handheld frother.
- Fresh, medium‑dark roast beans produce the best crema and flavor.
- Temperature control (around 150 °F/65 °C) is crucial for stable foam.
- Avoid over‑heating milk; it destroys proteins needed for creaminess.
- Experiment with spices, syrups, or cocoa for personalized flavor twists.
Why Creamy Coffee Matters
Creamy coffee elevates the everyday brew into a café‑worthy experience. The microfoam adds a luxurious mouthfeel that balances bitterness and enhances aroma. Furthermore, a velvety top layer helps retain heat, keeping your drink enjoyable longer.
Moreover, mastering this skill saves money and reduces reliance on single‑use pods or costly machines. As a result, you gain flexibility to craft café‑style drinks anytime, anywhere.
Essential Tools You Need
You don’t need a professional steam wand to achieve creamy results. Instead, a few common kitchen items work surprisingly well.
- French press – doubles as a milk frother when you plunge the plunger.
- Mason jar with lid – perfect for shaking cold or warm milk.
- Handheld whisk or milk frother – quick and efficient for small batches.
- Blender or immersion blender – creates vortex‑driven foam in seconds.
- Thermometer (optional) – ensures milk stays in the ideal temperature range.
Choosing the Right Coffee Beans
The foundation of any creamy coffee lies in the bean selection. Medium‑dark roasts offer a balanced acidity and enough oils to support foam formation. Furthermore, freshly ground beans preserve volatile aromatics that enhance perceived creaminess.
Look for beans labeled “espresso roast” or “medium‑dark” from reputable roasters. Avoid overly light roasts; they lack the body needed for a rich mouthfeel. Consequently, your final cup will feel smoother and more satisfying.
Methods to Make Creamy Coffee Without Machine
French Press Technique
First, brew a strong cup of coffee using your French press. Then, pour warm milk (about 150 °F) into the clean press, place the lid, and pump the plunger up and down for 20‑30 seconds. As a result, you’ll generate a thick, velvety foam that sits atop your coffee.
Furthermore, this method works well for both dairy and plant‑based milks, though soy and oat tend to froth best.
Mason Jar Shake
Fill a mason jar no more than halfway with warm milk. Seal the lid tightly and shake vigorously for 30‑45 seconds. The motion creates microbubbles that stabilize into foam. After shaking, let the jar sit for 10 seconds; the foam will rise to the top.
In addition, you can microwave the jar (without the lid) for 20‑30 seconds to warm the foam before pouring it over coffee.
Hand Whisk or Frother
Warm your milk in a saucepan or microwave, then transfer it to a deep bowl. Using a handheld whisk, move in a rapid circular motion for 20‑30 seconds. Alternatively, a battery‑operated milk frother can achieve similar results in half the time.
Consequently, you’ll notice a glossy, thick layer forming on the surface—perfect for latte art attempts.
Blender Method
Pour warm milk into a blender, secure the lid, and blend on medium speed for 20 seconds. The vortex created by the blades introduces air efficiently. After blending, let the foam settle for a few seconds before pouring.
Furthermore, this technique yields a uniform foam that integrates smoothly with the coffee.
Immersion Blender Shortcut
Submerge an immersion blender just below the milk surface and run it on low for 15‑20 seconds. Move the wand slowly upward to incorporate air throughout the liquid. As a result, you’ll achieve a creamy texture comparable to a steam wand.
In addition, cleanup is quick—just rinse the wand under warm water.
Step‑by‑Step Recipe: Classic Creamy Coffee
- Measure 2 tablespoons of freshly ground medium‑dark roast coffee per 6 oz water.
- Brew using your preferred method (French press, pour‑over, or AeroPress) to produce a strong concentrate.
- While coffee brews, heat ½ cup milk to 150 °F (65 °C) – do not boil.
- Choose a frothing method (French press, mason jar, whisk, blender, or immersion blender) and froth the milk until velvety foam forms.
- Pour the brewed coffee into a mug, holding back the foam with a spoon.
- Gently spoon the foam on top, creating a smooth layer.
- Optional: sprinkle cinnamon, cocoa powder, or a drizzle of vanilla syrup.
- Enjoy immediately while the foam is intact.
Tips for Perfect Foam Every Time
First, always start with cold milk; it incorporates air more effectively when warmed. Furthermore, avoid filling your frothing vessel more than halfway to prevent spillage. Moreover, keep the whisk or frother just below the surface to draw in air without creating large bubbles.
Additionally, practice the “swirl and tap” technique: after frothing, give the pitcher a gentle swirl and tap it on the counter to collapse any large bubbles, resulting in a silkier microfoam.
Consequently, your coffee will display a glossy, uniform top that holds latte art patterns.
Common Mistakes to Avoid
One frequent error is overheating the milk beyond 160 °F, which denatures proteins and destroys foam stability. Furthermore, using old or stale coffee leads to flat flavor, masking any creaminess you achieve.
Another mistake is frothing in a narrow container; limited space restricts air incorporation. As a result, you end up with uneven bubbles rather than a uniform microfoam.
Lastly, neglecting to clean your frothing tool between uses can introduce off‑flavors. Therefore, rinse thoroughly after each session.
Flavor Variations and Add‑Ins
Once you master the basic technique, experiment with flavors to keep your routine exciting. Add a pinch of ground cardamom or nutmeg to the milk before frothing for a spiced twist.
Furthermore, a teaspoon of cocoa powder or melted chocolate creates a mocha‑style drink. For a sweet note, swirl in caramel sauce or hazelnut syrup after pouring the foam.
Consequently, each variation offers a new sensory experience while preserving the creamy texture you worked hard to create.
Storage and Reheating
Creamy coffee is best enjoyed fresh, but you can store the coffee base separately in an airtight container in the refrigerator for up to 24 hours. Furthermore, keep frothed milk in a sealed jar for no more than two hours; after that, the foam collapses.
When reheating, warm the coffee gently on the stove or in the microwave, then re‑fresh the milk using your preferred frothing method. As a result, you’ll regain much of the original creaminess without sacrificing quality.
Health Benefits and Considerations
Moderate coffee consumption has been linked to improved alertness and antioxidant intake. Furthermore, adding a small amount of milk provides calcium and vitamin D, supporting bone health.
However, be mindful of added sugars and syrups; they can quickly increase calorie count. Consequently, opt for natural sweeteners like honey or stevia if you need extra sweetness.
In addition, those with lactose intolerance can choose oat, almond, or soy milk, which froth well and offer comparable creaminess.
Related Coffee Topics You May Like
Frequently Asked Questions
Can I make creamy coffee without any special equipment?
Absolutely. A simple mason jar, a whisk, or even a French press can create velvety foam. The key is to introduce air into warm milk while maintaining the right temperature.
What type of milk works best for foam?
Dairy milk with a higher fat content (whole or 2 %) produces the richest foam. Among plant‑based options, oat and soy milk froth exceptionally well due to their protein and stabilizer content.
Is it necessary to use a thermometer?
A thermometer helps ensure the milk stays between 140 °F and 155 °F, the ideal range for stable foam. If you don’t have one, heat the milk until small bubbles form around the edges but do not let it boil.
Yes. Over‑heating damages the proteins that trap air, resulting in thin, quickly collapsing foam. Keep the temperature below 160 °F for best results.
How can I add flavor without sacrificing creaminess?
Add spices, syrups, or cocoa to the milk before frothing, or swirl them in after pouring the foam. This distributes flavor evenly while preserving the microfoam structure.
Ready to Brew Your Perfect Cup?
Grab your favorite beans, try one of the methods above, and experience café‑quality creamy coffee at home—no machine required.
In summary, mastering how to make creamy coffee without machine opens up a world of delicious possibilities right in your kitchen. By selecting quality beans, controlling milk temperature, and using simple tools like a French press or mason jar, you can consistently produce silky, luxurious foam.
Furthermore, experimenting with flavors and avoiding common pitfalls ensures each cup feels like a treat. Consequently, you’ll save money, reduce waste, and enjoy the satisfaction of crafting barista‑level drinks whenever the mood strikes.
Finally, remember that practice makes perfect. Keep refining your technique, and soon you’ll be able to impress friends and family with your homemade creamy coffee creations.

Moses Anthony
Moses Anthony is a coffee enthusiast and home brewing specialist with over 7 years of hands-on experience testing coffee beans, espresso machines, grinders, and brewing methods. He has spent years experimenting with pour-over, French press, drip coffee, and espresso to help everyday coffee drinkers brew better coffee at home.At Best Coffee Guide, Moses focuses on practical brewing tips, honest product comparisons, and beginner-friendly coffee education based on real testing and research. His goal is to simplify coffee brewing and help readers make better choices with confidence.
How to Make Coffee Easy: Effortless Tips for Barista‑level Brew at Home
September 17, 2026
No Comments
Read More » Mastering the Art: How to Make Coffee Darker for a Richer, Bold Brew
September 16, 2026
No Comments
Read More » 
How to Make Coffee Dip: Easy Steps to Create a Rich, Coffee-infused Spread
September 15, 2026
No Comments
Read More » Latest Pots
Imagine waking up, craving a rich cup, but feeling overwhelmed by complicated machines and vague recipes. You want great coffee without the fuss, and you deserve a method that works every single time. This guide shows you exactly how to make coffee easy, turning morning…
Many coffee lovers crave a cup that looks as deep and intense as its flavor promises. If your brew often turns out light or washed out, you’re not alone—achieving that striking darkness involves more than just adding extra grounds. In the next few paragraphs we’ll…

Explore the world of coffee with honest reviews and practical advice. Find your perfect cup, one bean and machine at a time.
Main Menu
Top Categories
Newsletter
Sign up our newsletter to get updated information, promo or insight for free.
Copyright © 2025 Best Coffee Guide, All rights reserved.