
How to Make Frothy Coffee at Home Without Machine: Simple Tricks for Café‑style Foam
Jump To
How to Make Frothy Coffee at Home Without Machine: Easy Tips for Silky Foam
Key Takeaways
- You can create silky foam with everyday tools like a French press, mason jar, or whisk.
- Freshly ground beans and the right milk temperature are essential for stable froth.
- Technique matters more than equipment – practice the pour, shake, or whisk motion for best results.
- Avoid overheating milk; aim for 140‑155 °F (60‑68 °C) to preserve sweetness and texture.
- Experiment with flavors (cinnamon, vanilla, cocoa) after mastering the basic foam.
Imagine waking up craving a velvety latte but realizing your espresso machine is out of order. The good news is that you don’t need fancy gear to enjoy café‑quality froth at home. In this guide, we’ll walk you through proven, low‑cost methods that deliver rich, airy foam using items you likely already own. By the end, you’ll know exactly how to make frothy coffee at home without machine and be able to impress friends with barista‑level drinks every morning.
Why Frothy Coffee Matters
Froth adds a luxurious mouthfeel that balances the bitterness of coffee and enhances aroma perception. A stable foam layer traps volatile compounds, delivering a richer scent with each sip. Moreover, the visual appeal of a smooth, glossy top transforms an ordinary cup into a treat worth savoring. Understanding the science behind foam helps you troubleshoot issues and replicate consistent results.
Essential Tools You Don’t Need a Machine For
You don’t have to invest in an expensive steam wand. Instead, gather a few household items:
- French press or plunger pot
- Mason jar with lid
- Small whisk or fork
- Handheld milk frother (battery‑operated)
- Saucepan and thermometer (optional but helpful)
- Clean, dry cloth for wiping spills
Each tool creates foam through agitation, introducing air bubbles that stabilize with milk proteins. Choose the method that matches your kitchen setup and desired foam texture.
Choosing the Right Coffee and Milk
Start with freshly roasted beans ground to a medium‑fine consistency for drip‑style brewing. Freshness ensures crema formation, which contributes to foam stability. For milk, whole milk yields the creamiest froth due to its higher fat content, but 2 % works well too. Plant‑based alternatives like oat or barista‑style soy milk can also froth successfully when they contain added stabilizers.
Temperature is critical: heat milk to between 140 °F and 155 °F (60‑68 °C). Exceeding this range denatures proteins, causing the foam to collapse. Use a kitchen thermometer for precision, or test by touching the side of the pitcher – it should feel hot but not scalding.
How to Make Frothy Coffee at Home Without Machine
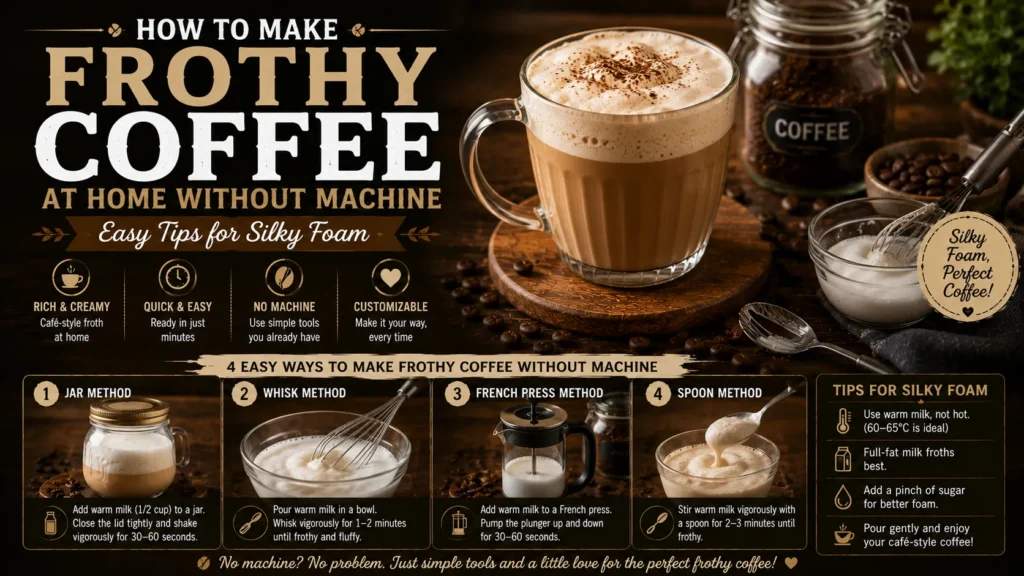
Now we arrive at the core technique section. Below are four reliable methods that require no espresso machine. Pick the one that feels most intuitive and practice until the motions become second nature.
French Press Plunge Method
This method mimics the action of a steam wand by using the plunger to force air through heated milk.
- Pour cold milk into the French press, filling it no more than one‑third full.
- Heat the milk in a microwave or saucepan to the target temperature.
- Return the heated milk to the press, place the lid on, and pull the plunger up and down vigorously for 20‑30 seconds.
- You’ll notice the volume increase and a creamy texture forming on top.
- Tap the press gently on the counter to collapse large bubbles, then swirl to integrate the foam.
- Pour the frothed milk over your brewed coffee, holding back the foam with a spoon if you prefer a layered latte.
Mason Jar Shake Technique
Ideal for quick mornings, this technique relies on vigorous shaking to aerate milk.
- Fill a clean mason jar halfway with cold milk.
- Secure the lid tightly.
- Shake the jar hard for 30‑45 seconds until the milk looks frothy and has doubled in volume.
- Remove the lid and microwave the jar uncovered for 30‑seconds to stabilize the foam (or heat the milk first, then shake).
- Pour the milk over coffee, spooning foam on top as desired.
Whisk or Fork Hand‑Agitation
When you lack a press or jar, a simple whisk works surprisingly well.
- Heat milk to the proper temperature in a small saucepan.
- Transfer the milk to a deep bowl.
- Using a balloon whisk, whisk in a rapid back‑and‑forth motion, incorporating air.
- Continue for 20‑30 seconds until frothy peaks form.
- Tap the bowl lightly to break large bubbles, then swirl.
Battery‑Operated Handheld Frother
If you own a handheld frother, the process is almost effortless.
- Warm milk to the target range.
- Insert the frother’s whisk just below the surface.
- Turn it on and move in slow circles for 20‑seconds.
- Lift the whisk slightly to create a vortex, which draws more air in.
- When the milk has increased in volume and looks glossy, turn off the device.
Each method yields a slightly different foam texture. The French press creates dense, micro‑foam; the mason jar gives a lighter, airier froth; the whisk delivers a customizable texture; and the handheld frother offers consistency with minimal effort.
Tips for Perfect Foam Every Time
Even the best technique can fail if you overlook a few details. Keep these pointers in mind:
- Always start with cold milk; it incorporates air more effectively when heated.
- Do not over‑fill your vessel – leave room for expansion.
- Use a smooth, consistent motion rather than jerky shakes.
- After frothing, let the milk sit for 10‑seconds; this allows unstable bubbles to burst, leaving a smoother micro‑foam.
- Pour milk slowly, holding back the foam with a spoon to create latte art if desired.
Common Mistakes to Avoid
Understanding pitfalls saves time and frustration.
- Using ultra‑hot milk (>160 °F) – proteins break down, foam collapses.
- Re‑heating frothed milk – destroys the delicate bubble structure.
- Skipping the thermometer reliance on fresh milk – older milk has lower protein content.
- Frothing in a too‑wide container – insufficient depth matters less surface agitation, weaker foam.
- Neglecting to clean tools – milk residue can impart off‑flavors.
Flavor Variations and Add‑Ins
Once you’ve mastered basic froth, experiment with these enhancements:
- Spices: sprinkle cinnamon, nutmeg, or cardamom into the milk before frothing.
- Sweeteners: add a teaspoon of honey, maple syrup, or vanilla extract to the milk.
- Chocolate: mix in cocoa powder or melted chocolate for a mocha twist.
- Alcohol: a splash of flavored liqueur (e.g., amaretto) creates an adult treat.
- Alternative milks: try oat, almond, or soy barista blends for dairy‑free foam.
Remember to adjust sweetness levels after frothing, as some additives can affect foam stability.
Storing and Reheating Frothed Milk
Frothed milk is best enjoyed immediately, but you can store leftovers for a short period.
- Place the frothed milk in an airtight container in the refrigerator for up to 2 hours.
- Before reuse, give it a gentle shake or quick whisk to revive texture.
- Avoid microwaving frothed milk directly; instead, warm it slowly in a saucepan while stirring.
For longer storage leads to better results.
If you notice separation or a grainy texture, discard the batch and start fresh.
Final Thoughts
Learning how to make frothy coffee frothy machine doesn’t require a machine opens up a world of café‑style drinks right in your kitchen. With a few simple tools, attention to temperature, and practiced technique, you can produce silky, stable foam that rivals any espresso bar. Embrace the process, tweak variables to suit your taste, and enjoy the satisfaction of crafting beautiful coffee creations every day.
Related Coffee Topics You May Like
Frequently Asked Questions
Can I use cold milk directly for frothing without heating?
Cold milk can be frothed, but the resulting foam is less stable and tends to collapse quickly. Heating milk to 140‑155 °F (60‑68 °C) denatures whey proteins just enough to create a stronger network that traps air bubbles, yielding longer‑lasting froth. For best results, always warm your milk before frothing.
Which milk alternative froths best for latte art?
Oat milk labeled “barista blend” consistently produces the creamiest micro‑foam suitable for latte art, thanks to its higher fat and protein content. Soy milk with added stabilizers also works well, while almond and coconut milks tend to create larger bubbles and are less ideal for detailed designs.
Yes, a French press can create foam suitable for cappuccinos. After heating the milk, plunge the press vigorously for 20‑30 seconds to incorporate air. The resulting foam is dense and velvety, perfect for topping a cappuccino. Just be sure not to over‑plunge, which can cause large bubbles and a grainy texture.
How do I prevent my frothed milk from separating after pouring?
Separation usually occurs when milk is overheated or when the foam is left to sit too long. To prevent this, keep the milk temperature within the recommended range, froth just before serving, and pour immediately. If you must wait, give the milk a gentle swirl or quick whisk before use to reintegrate the foam.
Ready to Elevate Your Coffee Game?
Grab your favorite mug, try one of the methods above, and share your frothy masterpiece with us!

Moses Anthony
Moses Anthony is a coffee enthusiast and home brewing specialist with over 7 years of hands-on experience testing coffee beans, espresso machines, grinders, and brewing methods. He has spent years experimenting with pour-over, French press, drip coffee, and espresso to help everyday coffee drinkers brew better coffee at home.At Best Coffee Guide, Moses focuses on practical brewing tips, honest product comparisons, and beginner-friendly coffee education based on real testing and research. His goal is to simplify coffee brewing and help readers make better choices with confidence.
How to Make Coffee Easy: Effortless Tips for Barista‑level Brew at Home
September 17, 2026
No Comments
Read More » Mastering the Art: How to Make Coffee Darker for a Richer, Bold Brew
September 16, 2026
No Comments
Read More » 
How to Make Coffee Dip: Easy Steps to Create a Rich, Coffee-infused Spread
September 15, 2026
No Comments
Read More » Latest Pots
Imagine waking up, craving a rich cup, but feeling overwhelmed by complicated machines and vague recipes. You want great coffee without the fuss, and you deserve a method that works every single time. This guide shows you exactly how to make coffee easy, turning morning…
Many coffee lovers crave a cup that looks as deep and intense as its flavor promises. If your brew often turns out light or washed out, you’re not alone—achieving that striking darkness involves more than just adding extra grounds. In the next few paragraphs we’ll…

Explore the world of coffee with honest reviews and practical advice. Find your perfect cup, one bean and machine at a time.
Main Menu
Top Categories
Newsletter
Sign up our newsletter to get updated information, promo or insight for free.
Copyright © 2025 Best Coffee Guide, All rights reserved.